Dealing With Nature – Part 4: When It Goes Bad…

OK, why should you care about any of this woodsy stuff?  After all, we are all rushing headlong into 2020, for pity’s sake, the age of computers, robots, cell phones, the “internet of things” where everything is connected to everything else.  Where a bunch of you will head out to take your landscape photos WITH your cell phone and all of its functionality.  So, who, today, really needs any of this knowledge or these skillsets?

Good and reasonable question.  And if you live in a techno-bubble where the closest you get to real nature is a Sierra Club calendar, then baring natural disasters, power outages, economic catastrophe’s etc. have a self-recovering car, and an endless fuel supply and lifetime battery capacity, and then make sure that you never stray more than a few feet from the asphalt, then it is highly likely you’ll never ever need to know any of it.

That, however, does not describe me or my life or my photography quests.  So let me give you a personal example of how things might lead to an emergency situation.

A couple of years ago, in the early Spring, I had gone up to Oakhurst, a little town on the southern border to Yosemite National Park, to visit a great friend, Nikko, and to also take a few quick dips in the Yosemite Valley area for photos.  Nikko is owner of an incredible restaurant named “Bread Head” and if you are ever in that area and need some REALLY good food for breakfast or lunch this is the place. (https://www.breadheadrestaurant.com/).  And if Nikko is there, be sure and say “Hi” for me.

Nikko is also an excellent photographer and, since she has lived there for quite a few years, knows the area very well.  So she suggested we head south around Bass Lake where there was some terrific scenery.  I wasn’t aware there was ANYTHING in that direction so agreed and off we went.

She was right, of course.  There were some incredible overlooks of the lake and, further south a quaint town and, to the east, according to the map, a way for us to take a loop through the forest and end up back on the Lake road.  So after a fun lunch we were off on our adventure.  (Remember what I had, in an earlier part of this series, defined as an “adventure?”)

The “main” road was old pavement, broken in places, littered with debris from recent storms and winds.  Clearly this was not a route that was heavily traveled.  But the day was clear and sunny, the company was great, and so we stopped a couple of times for photos before we found the side road through the forest.  It was, as are most forest roads, dirt.  But it was more or less level and clearly designed for normal cars… at least during the normal summer season…

We had gone a mile or so when we came on our first snow drift across the road.  Inspection revealed that it was only a few inches deep so we powered through it easily and kept on.   A second one, determined to be only slightly deeper, was also easily negotiated.

By the time we came on the third drift, although it was longer than the others, did not appear to be all that much deeper, so without further inspection, off we went…

And we made it almost exactly half way.

What was not evident under the snow was that this was also spanning a runoff channel and someone had previously powered through it when it was muddy and carved some deep ruts in it.  When I hit those, I was stopped and now my wheels just spun and polished the snow.  It was as if the tires were sitting inside watermelon peels.  We were not going anywhere, forward or backward.  Power-rocking the vehicle was useless.  True, it did result in some movement but it was not forward or back… only down.  That was definitely the wrong direction, so there we sat.

I’m relating this tale to illustrate how easy it is, on the best of days and with no intention or expectation of doing any potentially dangerous travel, to find oneself in trouble.  During that year’s spring season it was common for late storms to move through the area so this situation could turn very bad very quickly.  We were stuck because I had made a mistake.  The length of that drift should have gotten me out of the car to walk it and probe it better.  I could see the water channel above and below it but was preoccupied and it did not register.  All of the signs for caution were readily available but I didn’t see them or pay attention to them and because of that, there we sat, halfway into the drift on a road that, given the dearth of tracks and the heavy cover of leaves and debris, likely would not be traveled for quite some time into the future.

I got out to assess the situation.  I had followed the initial mistake with yet another mistake; in trying to rock the car I had simply dug a deeper set of holes for the tires.  Years of winter driving in Colorado mountain country apparently had taught me nothing or if it had, that knowledge had dribbled out of my brain during my sojourn in Southern California.  Fortunately there was one bit of self-advice I had taken, the car was equipped with some recovery and survival gear.  That stuff tends to just live in my vehicles so I do not have to think about it except to periodically resupply or update some of it.  Good thing too, “thinking” did not seem to be my major skill that day.  I’d love to blame my company but don’t think it would hold up to any real scrutiny.

So step one was to give it “The 30-Second Stare” and objectively consider the options.  There was no cell phone coverage so calling for help was not possible.  Walking for help could be a long and unsuccessful plan unless we would walk the 20+ miles back to the little town where we had lunch.  That had to be the plan of last resort.  That meant the best plan was to recover the car back to solid ground or at least on through the drift and hope for better conditions down the road; but in both cases we had to get the car out of that drift.  Without some equipment that would be impossible, and walking would be the only option remaining, poor as it would have been… (hint hint…)

In each of my vehicles is, at minimum, a backpack of survival gear plus some recovery gear.  It doesn’t take all that much room, so plenty is left for stowing photo equipment.  Here are a couple of views of my primary survival pack.

Survival Backpack outside

Here is the outside of my primary survival pack.  It usually lives in my vehicle.  I have another smaller version I toss in if I know I’ll have someone with me.  In addition to this there are ponchos, blankets and tarps that also just live in the cars.

Survival Backpack inside

Here is the opened pack.  (It’s actually a re-purposed camera backpack.)  This has, on and in it, enough to keep[ me surviving for quite some time minus food and water for the long haul.  What you cannot see here in the packed interior, is that behind the water filters and Swiss Army Knife is a fixed blade but shorter “bush craft” type knife.  Also there is a small sewing kit in the compartment with the first aid supplies.  The fire making materials include, lighters, matches, ferrocerium rods and some magnesium shavings, plus some home-made fire-starters made from dryer lint and bees wax. In with the magnifying glass is also a signal mirror and a sharpening stone.

In addition to the survival pack I also had an incredible multi-purpose tool I bought years ago and have never seen another quite like it.  It is a “Hudson’s Bay” style single-bit axe, but the head is cleverly designed to allow attachment of several other tools including a shovel, a pick, a rake/hoe, fireline “Pulaski,” etc.  (Here is a link to the company where you can buy one: https://forresttoolco.com/the_max.html).

Max Axe Lay Out

This is the “Max-Axe” from Forrest Tools.  This photo is from their web page, my own set has a lot more wear and tear on it.  Designed primarily for foresters and forest-fire crews, it is incredibly durable and designed for heavy work.  I’ve had mine for almost 30 years and have had zero problems with it.

I also had my go-to knife, my big Shrade Bowie style knife; big enough to work as a small machete.  The main edge of the heavy 12″ blade is razor sharp and the recurve is sharpened with an edge profile more like a hatchet so it can do multiple chores.  As you can see, the poor thing has seen a lot of work over the years.

Schrade Bowie

This is my favorite outdoor working knife.  I don’t know if Schrade still makes them.  This 12″ blade is based on the “IXL” Sheffield made bowie design from the mid to late 1800s.  THe modern “sub-hilt” grip design really helps control the weight.  It takes an incredibly sharp edge.  My survival kits also contain smaller knives for fine work but if I had to head out with only one knife, this would be it.  I’ve made fires and shelters with small knives too but in a pinch, this is far faster when it comes to preparing wood for shelter supports and cover, or for burning.  The choil is perfect for use with a ferro rod.

The plan was to dig a trench in the snow for each tire for us to drive through and also to line it with debris and boughs for traction.  Nikko was a real trooper.  I put the Max-Axe shovel together and she grabbed it and started work on the paths for the tires all on her own.   I took the knife and went into the heavily forested areas around the road to gather boughs.  By only taking one or two per tree the tree is not harmed but it does take a bit longer.  By the time Nikko had the trenches made I had enough boughs to fill them.  A few were forced in under the wheels to give us a starting bit of traction and with Nikko sitting on the back to add a little weight to the drive wheels, we drove out like we were on asphalt.  Without her help it would have taken twice as long and used up twice the energy, especially for an old duffer like me.  But it was doable for us because of the tools available onboard the vehicle.  The full-sized shovel worked much faster than a small folding camp shovel designed to dig latrines, and also allowed her to stand up a little better.  The big blade mowed through 2-3-finger thick boughs like butter, so my effort was reduced far below what it would have taken with a small, light knife.

Through it all, I kept track of the time and, more importantly, the estimated time before the sun went below the trees and mountains to the west.  In case we could not extricate the car well before then and had to face the likelihood of spending a night in place likely to get very cold, then we would have needed time to prepare for that while we could still see easily.  Fortunately, the car and my survival pack, also was equipped with gear to make that unpleasant situation at least tolerable and, more importantly, survivable.  We had available extra blankets, and even two sleeping bags in the car so survival was really never in question.  comfort is another issue but it always is in an emergency situation.

Unfortunately we did not document the situation.  We were so focused on extricating ourselves before it got dark, all of our effort went into that.  We had a vehicle filled with photo and video gear but none of it was used during our vehicle recovery efforts.  Sorry…  I needed my friend Don Bartletti along to document it all.  He’d have done a far better job of it than I would anyway.

The point of all this is to show that even on the simplest of photo treks into the most beautiful of places, things can conspire, especially mistakes such as I made, to turn things serious and potentially dangerous very quickly and unexpectedly.  If I’m riding with someone else and I have no reason to assume they are prepared for such emergencies than I also have a small tactical bag of personal survival gear I toss in with my photo equipment.  If I know someone will be riding with me then I feel responsible for them and try to have enough equipment for both, but if I’m going with someone else, I want to make sure that if disaster strikes I can at least take care of myself.

Check out the photos above for what I take.  That may not be the best collection of gear for you but you need to have what YOU need, and, as importantly, what YOU know how to use.  The ultimate survival tool is useless if the owner does not know how to use it.  There are still plenty of places even in Nation Park or Forest areas where disaster can strike and you cannot count on rescue unless someone knows that you likely are needing it and where to look.  And even then you might be required to survive on your own for 3-5 days.  Can you do it?

By the way, the Spring 2020 Schedule is out for City College.  If you would like to take my Landscape Class, (Photo 245, CRN 24979) where we will be covering this type of thing in addition to the obvious photo material.  My co-teacher, Melinda Holden, is still listed as the instructor, but that is the right class.  So do sign up quickly so they don’t, as they have done in the past, cancel it before it even starts because admin does not have faith there will be enough students.  The days of waiting to crash a class are over.  For details check the course page by clicking on the link in the banner at the top of this page.

And for those of you who have heard me tell tales of my growing up on the farm/ranch under the guidance of my Indian uncle, I have completed a book about him that fleshes out many of those stories and may help explain a little about me and also why I still think he was the best man I even knew.  Scroll down the sidebar on the right side of the page and you will see the link to the printer where you can order a copy of that book and/or the others on the future of photography and the issue of dealing with school and mass shooters.

As always, if you have comments or topics you would like me to address, let me know.

Posted in Uncategorized | Leave a comment

The Dove

I almost called this “The REAL Lonesome Dove.”  For the past three months I’ve been haunted by the plaintiff calls of a dove in our neighborhood.  With the quarantine in full swing and due to the vulnerable state I’m in with both age and the cancer thing, I’ve really paid attention to the protocols for social distancing and mask wearing.  Clearly I’ve had a little too much time on my hands so for some reason I high centered on this dove.

I caught a very brief look at him and thought at first he was a “Mourning Dove” which we had all over the farm in Missouri.  But his strange (to me) call revealed him to be, instead, a “Eurasian Collared Dove.”  From about the time I woke in the morning, then off and on until about 8 in the evening, his plaintive calls seeking some companionship would ring through the trees, one right after the other. 

But they were never answered.

According to the field guide, this type of dove is not uncommon in this region but this poor fellow seems to have none others of his type to answer his calls.  So morning and afternoon into evening he repeats his lonely calls hoping that someone will answer.

I was going to try to make this a semi-photo-based post and hauled out one of my long lenses to use this as an excuse try my hand at birding photography.  (As I said, I’ve had way too much time on my hands.) But though I could hear him calling from one tree or another, all I could ever catch sight of was part of his body.  He sat way back in the branches and I thought that could not be a very brilliant spot from which to attract any passing dove babes.  But from around six-ish in the morning till almost dark I could count on hearing his “Ca-COO Coo” call repeated as if it were a looped recording.

I’m not an ornithologist so have absolutely no knowledge about the cognitive ability of birds generally, much less of doves, or of this type of dove in particular.  So I do not know, for example, if, for him, every day is a completely new world and he is unaware of the previous days and weeks of failure,  or, conversely, were the endless mornings filled with hope and the endless evenings of failure and despair adding up in his mind to where he considers simply flying into the next truck to come by.  But if he was in despair it did not slow down his calling out to any potentially passing lady dove that might be in the market for a persistent suitor and answer.

As time went on I began to worry about the forlorn dove calling endlessly but to no avail  The Bible says that God even sees the tiny sparrow that falls and surely a stately dove would be a little higher on His attention list.  So one night I addressed the Almighty on the Dove’s behalf.  I pled his case with eloquence and sincerity, a real example of my best law school moot court training.  Surely it would not be beyond Divine abilities to shoo some equally lonely female into the vicinity to hear his call and at least give him a chance at love and companionship before he pined away from loneliness and heartbreak.  Surely his pitiful cries were not falling on divinely closed ears.  I rested my case satisfied I had done my best.  Perry Mason would have stood slack-jawed in awe of my presentation.

To my surprise, the next day when I woke up and listened as always for his calls, the trees were silent.  All through the day I never heard a single call from him.  Was it possible?  Did God answer a simple human plea and actually send him a lady faire to warm his nest and give him comfort?  Or was He just tired of the incessant Ca-COO-Coo-ing over and over and over…

That night and the next day there was no call from him… nor on the third day.  Wow, I thought, he finally scored.  “Good for him!”  In a way I was actually sort of jealous. 

But on the fourth day I heard him call again.  A little tenuous and not as full throated as before, but unmistakably the same voice.  This time the calls were not continuous at first but would last for a half hour or less perhaps, then be quiet.  I dragged my big lens out again to try to find him but to no avail.  I thought once I had managed an interesting head shot framed in the leaves but as I was ready to shoot he turned back into the dense foliage.  This birding thing is harder than I gave it credit for. 

But about the dove and his lady, what could possibly have gone wrong?  This is Southern California so perhaps his species’ notable collar was not up to dove image standards?  A little lopsided, perhaps?

Our neighborhood, it turns out, is also home to a small group of crows.  They are the busybodies of the local bird world and stick their considerable noses into everyone’s business.  I was willing to bet dollars to donuts they knew the story.  And so they did.  And being the unrepentant gossips they are, were happy to share.   It turns out this drop-dead gorgeous lady dove flew in from the beach, heard the calling and dropped by to see what was happening.  They chatted and discussed nesting arrangements and her trousseau, and things seemed right on course to a happy ending.  But just as the exchange of sprigs was about to happen, our hero produced a multi-page pre-nup that so offended her she gave him the bird, so to speak, and stormed back to the laid-back doves at the beach.

Wow, what an ingrate.  And to think I prayed for the guy!  The crows thought it was highly amusing and said they heard from the parrots that the surfer dove lady spread the word about what a jerk he had been so it was unlikely another would come this way.

So now he is at it again, calling his brains out morning and night to try to lure another lovely and hopefully desperate dovette into his clutches, presumably with pre-nup at the ready.  But the word is out buster…  You may be hiding in your tree and calling out a very, very long time.

And as for my photography, the next time I decide to try my hand at birding I’ll try an easier target… like a bird feeder, or perhaps the zoo.

Posted in Uncategorized | 10 Comments

COMMUNITY COLLEGE CONUNDRUM

It is always dangerous to let me get bored…

I can only speak to my own venue here in Southern California, but it appears to me that our world-class Photo Program is now thoroughly caught in a maelstrom caused by competing currents formed initially by two competing goals and purposes for Community Colleges as their primary mission.  A third current adds to the whirlpool danger because it stems from a State which has so massively over-spent and over-promised unfunded liabilities it is technically bankrupt with no ability to EVER have the money to pay its obligations.  Yet it is facing serious lobbying by the State’s 4-year schools to bail them out by funneling more students their way.  And the obvious place they want to get them is via the Community College System.

Historically, the Community College objectives have been a bit schizophrenic anyway.   Initially it was seen as a softer pathway to a “real” college by interposing a semi-college experience without the educational rigor and hard demands for performance that a real University traditionally exhibits.  This was especially important in a venue where the educational standards and test results on the high school level were on a significant slide.  This “Prep School” approach was an attempt to help that and the common name for this preparatory institution was a “Junior College.”  It was a transition from the decreasing rigor of the high schools into the difficult educational world of the University were they generally tried to solicit students not by being the easiest but by being the best which usually means being tough.  I recall courses requiring considerably more homework time than class time, where a test a week was common and the cutoff point for failure was more like 75% not 50%. 

That cold world was a shock to the system of kids coming out of high schools where hard subjects were being dropped and warm and fuzzy PC topics became more and more common.  The result? This is now a place where top students are taking special courses in the Community Colleges to earn both High School AND college level credits because the topics are no longer available in the High Schools

This was a place where exit exams were increasingly denigrated and finally cancelled because they might make the failing students feel bad.  This was Doctor Spock on steroids where “feeling” good was of far more importance than actually learning to BE good at something.  This was a so-called educational system where, in the late 80s, the legislature and educational system patted itself on the back in front-page, above the fold, newspaper headlines by making it mandatory that high School students again pass an exit exam… but to pass they had to score on the 10th grade equivalency level. 

It has been a long time since I was in High School but I distinctly remember my Senior year was the 12th grade… or was I just stupid and had to go two extra years to get out?  In fact I would NOT have gotten my diploma if I could score no better than a 10th grader.  And some didn’t.  And didn’t.

Meantime, back in the 70s someone finally pulled their head from the educational system quicksand and realized that the world did not run exclusively by people with 4 year and graduate degrees.  Holding the entire ship afloat was a foundation of people, every bit as competent in their rolls as any PhD lecturer, who maybe never had real job in their lives.  These were people with no degrees, no diplomas, but with extraordinary skills at things like building houses and cars (and keeping them running), fixing plumbing and air-conditioning, creating the advertising that sold the goods and services that kept the country’s productivity humming along, and who provided the transportation that moved all of that through the country.  But they too were not born with the knowledge and skills they needed, they had to learn it somehow, and, better yet, they entered the work force and started paying taxes faster than those going on to get their advanced degrees in such incredibly society-necessary fields as, say, Poli-Sci.

And that led to a change of approach in which the Prep-School model for Junior Colleges became the Vocational-Technical (Votech) model for the newly titled “Community Colleges.”  Here, you could still do the University Prep courses on a softer track than just being dumped into the maw of the 4-year University, but increasingly you could also learn the vocational and technical skills to actually get a real job.  The old cliché of “Those who Can, DO and those who Cannot, TEACH” was exposed as having a lot of veracity, and those votech courses taught by people with years of experience in their fields drew a whole new body of students, hungry for the skills to let them go out and get a job.

Of course, the “educational” wing looked down on the “vocational” wing with utter disdain.  Why, good grief, there wasn’t a PhD among ‘em.  And without that, who could take you seriously?  The answer was the work force and the students.  But despite that, some of these so-called “trades” topics flourished and drew a good supply of students.  And among them were programs, like ours, that offered education in the very hard, competitive world of professional photography.

Professional photographers were the ones to illustrate the news so those 10th graders could have a better understanding of what was happening.  It was professional photographers who showed the world through advertising and fashion, what was for sale, how it could look, and why you ought to choose one brand over another.  And as we evolve to more and more online sales and less and less brick and mortar store fronts, those photographs are becoming more important than ever to help keep commerce and productivity moving forward.

However, now that lack of State funds for education has whipped this whirlpool back into a vessel- sinking froth.  The Universities were quick to the table to get in their pleas for funding.  And, truth to tell, public and higher education ought to be a very high item on the State’s economic triage list, perhaps second only to public safety and intrastate commerce.  Actually since I do believe that the future of a state or country is dependent on the education of its citizens I’d have to be convinced that education, per se, should not be the HIGHEST priority for its funds… and so far, I’m not.

 Alas that does not seem to be the case in government or in the educational system, and by the time the actual list got down to educational needs, there was far too little left to go around in any meaningful way.  And since California has offered highly subsidized Community College  credits for years (students now pay in the vicinity of $120.00 per credit LESS than what it costs to offer the courses, that deficit being made up by the state) one obvious way to keep more money for the Universities is to cut back on Community College courses. 

Once that decision is made then the question remains, which courses?  Should we cut back on the courses the students could get in the 4 year schools anyway though they would be tougher?  Or should we cut back on the courses that might put them more quickly into the work force paying taxes and helping the state out of its problems and which they cannot get at the Universities?  The decision ought to be a no-brainer.  And it apparently was.  Cut back on the votech courses.

So now there is precious little money for the votech courses, but wait, another decision needs to be made as to how to spend that money that is left.  And again, two primary options emerge.  Should we spend it to try to maximize the courses we can offer in the votech world to best serve those students that are here “by the book” as citizens or on legitimate student visas, green cards, etc.?  Or, since we are virtually a sanctuary state and campus, should we use it to provide full ride scholarships to undocumented students and “dreamers?”  Again, it ought to be a no brainer and apparently no brains were needed in the decision: provide the scholarships to undocumented students and then, of necessity, kill the votech classes which, of course, kills them for ALL potential students regardless of status even though these might serve these marginalized students better than the college prep courses.

Brilliant.  Another double handful of froth into the maelstrom.

I am fearful for the future of the professional photo program under such circumstances and attitudes.  Of course we were not asked to defend the program, or to explain why we should be allowed to run a full program to try to get students out into the workforce.  One person of astonishing ignorance said, “Well they have photo programs in the Universities.”  Yes they do, but they are all fine art programs not geared to professional level and type of work.  They do not concern themselves with the business of being a photographer.  We do. 

Oh well, maybe not for long.  I believe that if you have a job that can be broken into various task;  and each of those tasks can be identified, described, and reduced to an algorithm, then by the middle of this century your job will no longer exist and the tasks will be performed by robots or computers, or some form of AI device.  That is the increasing conclusion of more and more social scientists and historians.  According to the latest thinking, by 2050 as much as 50% to 70% OR MORE of the current jobs will simply cease to exist.  And unlike the industrial revolution where you simply needed to learn a new skill, this time there will be no new skills to learn and there will be no work to be had even if you did.  Then what?

One big question since this is increasingly accepted as a likely future by scientists, who of your political heroes seems to be addressing it and planning for it?  Anyone???  Wouldn’t you think a 70% unemployment would probably create a political issue?

And what about photography?  Well with the world increasingly going online for everything from education to retail sales, it will be the image makers who provide the material to help you learn and help you decide which product to buy. 

Now, if that indeed is the future we can expect barreling down on us, which of all those feel-good courses, those oh-so-sensitive philosophies, are the ones that may make you or your students part of the useful class and not part of the impending majority even now being called, the “USELESS CLASS?”  And how well do these educational decisions support success in that future? 

I’m told these decisions are all about “Social Justice.”  If that is the case, then I’d have to say just a tiny bit more thinking needs to be applied.  Justice, per se, is social.  A tribe of one person renders the idea of justice meaningless.  It takes a society to make the word have any meaning.  By definition, Justice IS social justice so the very term is a redundancy.  The question is what is meant by justice and then what kind of justice?  If justice means equality, then we still have at least two versions to consider: equality of opportunity (the kind of justice spoken of in our Constitution?  OR equality of outcome, in short, a form of universal justice?

The former is a workable goal but it is not achieved by viewing the world as a zero-sum game.  We are each different and will never be equal as individuals.  There are geniuses out there with far greater intelligence than I have.  Is that fair?  No.   I limp from military service, and I cannot climb the cable trail up to the top of Half Dome in Yosemite as I once could and would dearly like to do again.  So does that mean that for all of us that are physically challenged, the park should install an elevator to the top like it provides wheelchair ramps down in the valley?  Is it fair?  Of course not.  My birth certificate does not include a certificate of universal fairness to which I would be entitled just due to being born.

And if it did, what would that mean in practice?  Well, not always something good.  Professor Yorgrau, my old symbolic logic teacher at the University of Denver, once gave us an example.  Suppose you and 200 people are on a ferry that starts to take on water and will sink before it can reach the dock or help can arrive.  But because it was tourist season, the boat took on 75 more people than it has life preservers for.  Universal justice dictates the same outcome for all, and since all cannot be saved, then to be fair, an objective application of universal fairness means all must drown together.  Because you believe in universal justice will you go to the rail, serve as a model, and leap in?

And that is precisely what these decisions are doing for the school generally, and for our program specifically.  Trying to assure that we all drown together.  And what if someone were a good enough swimmer to actually make the shore?  Would that be allowed?  Not if we applied universal justice.  Universal justice is not and cannot be about bringing everyone up to the top tier because it is not always possible; instead, it is about bringing everyone down to the lowest common denominator where we all have equality of outcome.

If this were not a family channel, I could tell you what I’d like to see one do with that sort of justice and just where they should put it…

Just sayin’. 

Posted in Uncategorized | Tagged , , , , , , , , | 2 Comments

BORED

Those who know me know I have an incredibly low boredom threshold.  And all of this imposed quarantine due to the virus plus my crippled immune system due to the chemo, has simply pushed me into a near catatonic state of cabin fever.  I’ve cleaned gear, rearranged gear, charged batteries, all to sort of deal with a state of critical image-making withdrawal but not much was working.  Had it not been for the Spring online class someone would find me crawling the walls here.  But as soon as I get the final grades in that will be over.  Uh-oh… now what?

Summer appears to be a bust since our classes were cancelled.  That creates multiple issues for me but mostly it gives me little to relieve the boredom.

But wait…  I still am scheduled to teach the advanced digital class in Fall so this would be a good time to work out how to do that remotely and also add material I’ve learned since the last time I taught it.  And that sent me back through the archives to find some older work I shot but have not done anything with as a means of practicing some new stuff.

I came across this shot.  It was taken in 2010 on a fieldtrip to The Alabama Hills.  It is a shot of sunset along Tuttle Creek looking back to Mt. Whitney.  It was taken with a Canon 1Ds MKII (18 mp) and a Hasselblad Zeiss 150mm lens adapted to the Canon.  I’ve always loved the snap and color of those magnificent Zeiss lenses even though they must be used in complete manual mode with the adapter.

Sunset, Tuttle Creek Corral 2010

This file is the initial conversion from Canon RAW format.  I thought it had some potential but for some reason set it aside and haven’t seen it until a day or two ago rustling through old archived folders.  Maybe I just wasn’t sure what to do with it, and sometimes it takes some time to set a shot aside then return with fresh eyes.  But this time, I knew exactly what I wanted it to look like and between then and now picked up on some techniques I thought would help get to that point.

I had purposefully shot it fairly flat so that I kept needed details in all of the tonal areas, but now I wanted a much more dramatic finished piece to try to match the drama in the sky and ridgelines of the scene.   THe original was a start but did not really convey the emotional response I had standing there.  I had loved the way sun streaks highlighted the grasses and bushes along the old corral so that is what I pushed for.  And it gave me the chance to practice a few approaches for the new class.

So here is my final version

Sunset, Tuttle Creek Corral 2010

I don’t often use adjustment layers but this time, since I was experimenting, I used them extensively along with layer masking, luminosity masking, gradient mapping, LUTs (Look Up Tables), and various blend modes, not to mention some burning and dodging.  It was a fun exercise for me.

Now to turn all of this into lesson plans…

I really want to make the Photo 243 Advanced Digital Class a good one where we can explore a host of advanced digital shooting approaches along with some advanced editing techniques.  Those who have followed me know I believe ART is about interpretation not narration.  One of the reasons I gravitated to digital in the first place was the expansion of artistic options.  And it just keeps getting better.

Now it makes me want to go back through some other archives to see what I might be able to make better.  And I can hardly wait to get back to Alabama Hills!


Posted in Uncategorized | Tagged , , , , , , , | 2 Comments

This Quarantine Really Is Frustrating

Well, I can answer the question…. NO!  We are not having fun yet.

It’s heading toward the end of the semester and my landscape class is almost over.  Landscape photography, in case it ever comes up again, does not lend itself readily to distance education formats of learning.  We should be out in the field, as a group, practicing many of the techniques now I can only describe or attempt to demonstrate remotely through a video or two.

Last week the topic was night sky and milkyway shooting.  For some of the students in the past, getting out in Alabama Hills or even out in the desert at night and really — REALLiY — seeing the stars fill the night skies that go on forever is a true revelation.  And then finding out how easy it is in today’s digital world to make photos of it

Realizing they are making photographs with photon that left their home stars before any form of humanoid ever walked this planet is mind boggling.  I love being a part of that.  So that was frustrating.  But for this current week it was worse, for me at least.

This week the topic was doing time-lapse photography.  Like the night sky photographs, back in the film world this was extremely difficult requiring some specialized equipment.  But now, and especially as DSLR and Mirrorless cameras have evolved, it has become, well, pretty simple, though in this case a few pieces of extra equipment can really help.  But just TALKING about it and writing out procedure instructions, is a far cry and pale excuse for being able to get together and really shoot them, then go together into the digital lab, and put them together.

We learned that the decision has been made to make Fall 2020 a fully online semester.  At least we’ll have more than a week to plan out the classes and the students will have some experience having to deal with them.  Some topics can perhaps be even better taught using DE (Distance Education) techniques so perhaps it won’t be that bad.

No word yet on whether or not we will be allowed any classes this summer.  Maybe, if there is some interest we could do a workshop or two if the social distancing requirements by then allow it.  Let me know if you have some ideas.

And, before I sign off, I just wanted to send my appreciation for those who commented or emailed me directly with support for the Big “C” issue.  That really has meant a lot.

Posted in Uncategorized | 1 Comment

Once Again into the Rumor Mill…

Yes, it has been a long dry spell since I added a post here, but much has been happening to distract me and very little of it has been good.

Effecting not just me but all of my students and colleagues and, for that matter, nearly everyone on the planet, has been the onset of the Covid-19 pandemic and the resulting responses to it ranging the entire gamut from the rdiculous to the sublime. The situation was made worse in the current polarized climate when those responses, and the competing interests of medical safety and economic stability ran headlong into each other and were were instantly weaponized along political lines having little to do with either sound medical or sound economic issues.

That mostly just confused the issue and muddied the water but, as a friend noted, it did have a fascinating side effect on social media. Facebook somehow magically certified thousands of FB “friends” who had never in their lives cracked open a law book or medical reference work (too many big words, I suppose) but became magically endowed with a level of expertise in Constitutional Law and Epidemiology that would allow for no error — meaning all contrary views were, by definition, wrong and therefore not just bad, but evil and the actual words in the Constitution or the med books was just there to confuse you…

Meantime, here in California, Southern California to be specific, Community Colleges like City College were told on a Thursday afternoon that they would have one week to fully and totally transition every single course being offered to all online/Distance Education style courses. The campus shut down and both faculty and students were sent scurrying to learn how to operate in this new paradigm. I was lucky in that I’ve done a lot of DE courses and actually believe that SOME topics are actually delivered better with the addtion of web-based material. But I also know that some are not, and that list includes Photo lab and studio classes and other topics that are based on hands-on interaction in the field with students… such as my landscape class that had just gotten underway.

The result has been unsatisfactory for me and I know it has been for the students as well. But to their enormous credit, that class is full of serious photographers who have really gone “above and beyond” to help make it work. Whatever success derives from this semester as far more due to their willingness to work with this than any skills of mine at presenting it. This is one of those great classes you hope to have every once in a while when teaching and it is simply maddening that we cannot get together for real to go shoot and learn. These are the kinds of classes that turn teaching itself into a great learning experience. It grates heavily on me to feel that the system, for whatever benign reasons, is really cheating them here.

But… meantime… another issue has arisen that, for me specifically, has added insult to injury (or vice versa). About mid-March I suddenly developed some really severe pains in my lower abdomen that by the 20th were so intense I went into the Emergency Room at the VA hospital in La Jolla. It is about a 20-minute drive. I left my house at around 5-ish in the afternoon and returned at 3 am the next day having learned several fascinating things — in a macabre sort of way.

For one I learned for sure that I am what is called a “Hard Stick” patient, meaning that my veins are so scarred that it is very difficult to insert an IV line in the normal places (arms, hands, legs, etc.) . So I am now the proud owner of a “Power Port” inserted in my chest with a direct line to my heart and into which it is easy to insert an IV line. That device was installed using what is euphemistically called “Conscious Sedation” which is a medical procedure, I am convinced, was developed by Tomas de Tourquemada to speed along confessions of heresy in his role as Inquisator General, and I can tell you I would have confessed to nearly anything to get them to stop. While they were at it, they also biopsied a few cancer sites in my abdominal area. It was during that procedure that it became evident that my old very, very, very high tolerance to pain killing medicine from back in the military days has not gone away. Oh for joy…

Meantime, back in the ER that first night, the REALLY powerful news came not long before they sent me home with a calendar full of scheduled appointments and meds. The CT scans showed that the colon cancer that had been excised a year before and which earlier scans showed no signs of return, had, in fact. thought it over and like the Spanish re-conquest of the New Mexican Pueblos, came back with a vengeance and metasticised to, in the doctor’s words, “everywhere.”

Hmmmmmmm…. Now THAT didn’t sound all that good… And some subsequent research didn’t make it sound any better.

So now, I am starting the 3rd day after my 2nd infusion of Chemo Therapy scheduled for once every two weeks. For the first treatment, I had far less problems with side effects that was anticipated, which I am most grateful for. Statistically the worst days are 3rd – 5th following infusion so I’m now braced for that. But most of all I’m really frustrated. Of all the times in my life I want to surround myself with beauty and turn my cameras and mind into the awe and power of nature it is right now, right this moment. But until the government lifts the restrictions, we are still in a quarantine state and with my immunie system so compromised it is probably just as well.

But that’s why you’ve not heard much from me lately. This is not a story I enjoy telling, so honestly, just put it off. But enough people knew to start the rumors going so I thought it best to at least set the record straight as best I can. Hopefully before very long we will be able to get out and go take a good deep breath of clean mountain or desert air and basically ANYwhere out of the city. Stay tuned for updates that will, I truly hope, will be far more upbeat as well.

Posted in Uncategorized | 8 Comments

Seeking the Ultimate Resolution Pt 1

From the earliest days of film there has been a never ending quest for greater and greater resolution in the finished photographs.  Why?  Simple: greater resolution yields more and finer captured detail.   In the quest for greater resolution we saw larger formats of film being employed. And now, more and more pixels on the image chip is seen by some as the great goal for digital cameras.  But it is not so simple as it once was.

But with greater pixel counts comes a cost.  For a given, inflexibly sized image chip, the math is inescapable: to cram more pixels into the same space then each element must be smaller.  And that creates several problems, some a perfect reflection of issues in film and others unique to electronic media.  In the film realm, larger film grain allowed more photons to strike each grain and therefore had the effect of elevating ISO or film “speed.”  So there was competition between film speed and film resolution/granularity.   The only way to get more gains to capture a given field of view without lowering the film speed was to make the image capture area bigger.  And that, of course, had a logistics impact (it was more difficult to handle medium and large format than miniature 35mm format cameras) and it had a budgetary impact both for the camera platforms and the films.

Now, firmly in the digital realm, we face similar issues in trying to improve resolution.  Technology is allowing greater and greater miniaturization so making photo sensors smaller is possible.  But the issue of the photo sensors’ surface size remains and greater processing capability is needed to process the weaker signals and deal with the attendant noise generation.  And that has a major budgetary impact.  But as important is that we long ago passed the ability of traditional photo lenses to resolve the pixel sizes.  And, just to add to the issues, the interpolation process of converting monochromatic sensors into a color image degrade the actual capture resolution by at least a third OR MORE even though pixels are then re-created in the processor to appear to give you full advertised resolution.

So we are back to where we were in the film world: to gain both resolution and maintain image “speed” we need larger image chips leading us, once again, to medium format capture and along with that an enormous increase in cost.  And there are even very high resolution backs for large format cameras.  Bring the title to your first born and you too can have one…

A Swiss company made the Seitz panoramic camera that captured a 160 megapixel file from a 6 mm x 17 mm back.  But it was huge, heavy, came with its own computer for processing, I really wanted one until I actually got one in my hands and discovered it was like “crew served” artillery and not really for the lone photographer trekking out in the wilds for the ultimate mountain shot. And it was actually a scanning back so was not good for moving subjects either.  The photos were stunning.  But… But…

But lets get “real” here… who truly needs all that resolution and who doesn’t?  Despite what the sales folks tell you, unless you need to make larger prints with incredible detail, you can produce stunningly successful images with no more than 20 megapixels.  Output for websites, email, social media, in fact most print publication appearing in magazines and newspapers, etc. which are at relative low resolution and small sizes simply, will not be noticeably improved with greater resolution capture. If that is what you shoot then save your money and invest in top quality glass… you’ll get more out of it than you will out of more resolution.

However, if you are a fine art photographer needing large prints to sell or display, or if you are a commercial photographer who may be producing images as posters, magazine covers, high-end catalog covers, full-page and double-truck ads and illustrations, then now, higher resolution can make a valid competitive difference.  But when you really think about it, those genres also do not commonly need to photograph moving subjects; most landscapes and most product subjects will patiently sit there for you. (If the mountain is moving as you try to photograph it the resulting photo is the very least of your worries…)  And that subject stability and lack of movement turns out to be an important element in our discussion because it opens the door to another means of your gaining nearly unlimited resolution with very little equipment costs.

You can, in fact, create virtual medium format or even large format chips by the technique known as “stitching.”  The concept is simple: you break the scene into blocks, photograph each block separately, and then join or “stitch” these blocks together for the final image.  For example, a scene that is captured as a single image of 20 megapixels with a 50mm lens, might be broken into 12 parts with a longer lens, then joined for a combined resolution of 240 megapixels (minus any overlap).  Now THAT is some serious resolution.  And modern photo editing tools can join those images easily unlike the “old days” of a few years ago when you would have to do the joining manually.  The key now, is in the shooting.

Fortunately, there are some pieces of equipment that make the shooting easy and fairly quick despite how complex it might appear.  The first is a panoramic head (for single row wide and narrow shots) or a “spherical panoramic” head which allows you to take multiple rows of multiple frames each row for a “mosaic” of frames.  The key is being able to pivot the lens both horizontally and vertically on the lens’s optical axis to avoid distortion and ghosting of image elements that do not perfectly overlap.

Those spherical pano heads (check out Nodal Ninja by Fanotec – https://www.fanotec.com/ or to get your feet wet in the process, the Panosaurus https://cinescopophilia.com/the-100-panosaurus-2-0-pano-head/ ).  This type of head will (allow for virtually unlimited resolution depending on lens availability.  It is astonishing to see the detail available, but the problem is it takes a large print or special computer programs such as the Zoomify plug-in in Photoshop to zoom in where the amazingly fine detail is buried in the shot.  I’ve taken shots where on close examination I’ve discovered things in the print that my eyes could not optically resolve when I was standing there taking the photo.  It was not a problem to produce a shot of the Grand Canyon that with no enlargement, measures 180 inches across at full printing resolution (300 ppi).

That is incredible to see, for sure.  But, realistically, where would you be able to take advantage of that sort of print size?  Who has a wall for that?  (As an aside, one answer is corporate art but that is another subject).  But what if a resolution of, say, 120 megapixels (or 6 frames) would give you the shot quality needed for a poster or double-truck advertisement?

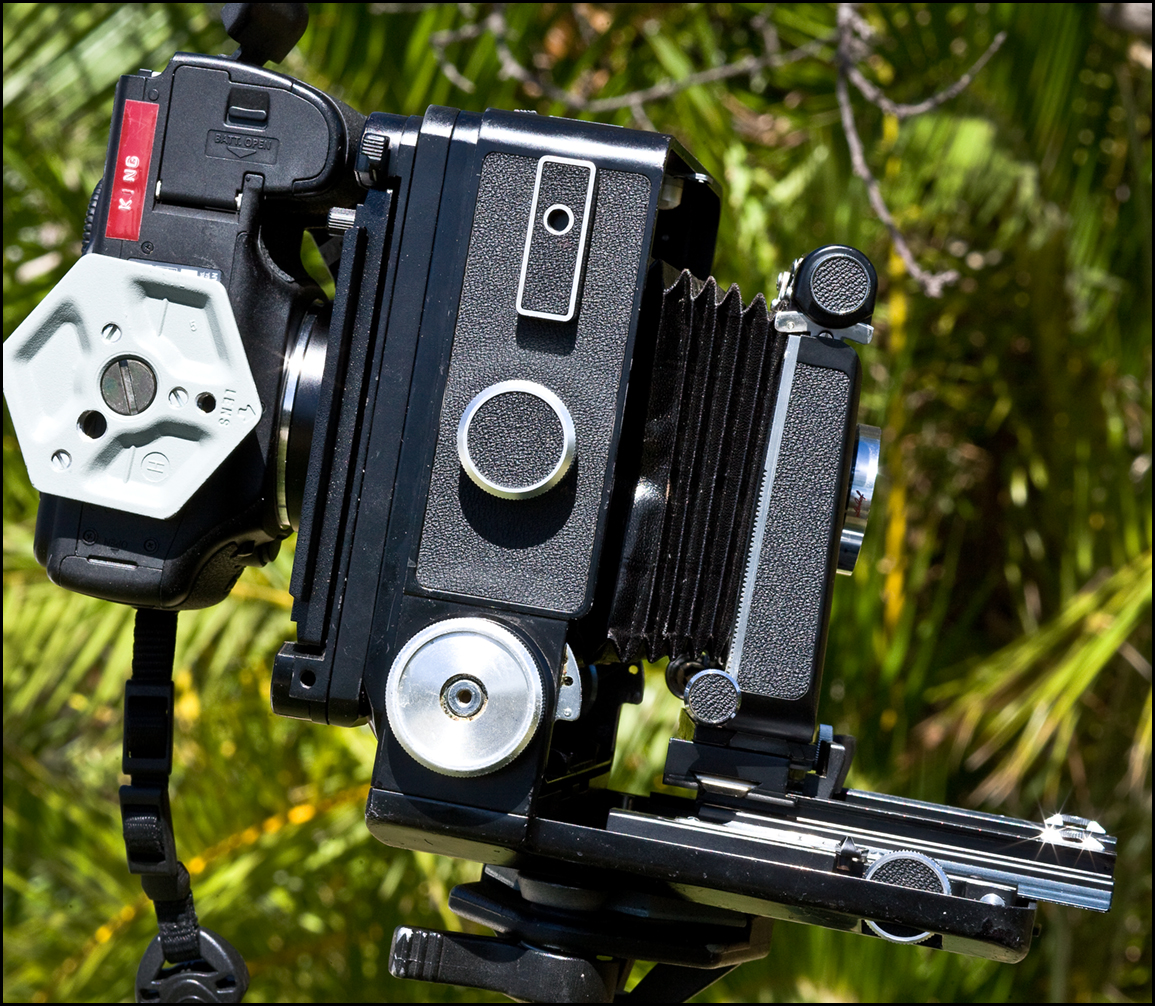
Or what if you needed a large, high res shot but with the optical corrections needed to be done by a view and technical cameras.  For those needs then the company Fotodiox ( https://fotodioxpro.com/  ) provides adapters to allow you to connect your digital DSLR or mirrorless camera to a real view camera or to medium format lenses and allow you to make a multi-row panoramic shot with perfect overlap although with limited numbers of frames. This avoids any parallax problems of the spherical pano head because all of the frames are coming from the same, non-moving, projected image. It also uses more of the frame since less overlap is needed.

D2 on wista 02 from side for blog

Canon 5D on Wista 4×5 Technical Camera from the side.  This allows for optical movements suitable for most shooting.  For extreme movements the same back attaches to full view cameras. I refer to this rig as my “digiview” camera.

If you do not need the optical movements of the view or tech camera, the Rhino Adapter from Fotodiox uses medium format lenses (in this case Hasselblad Zeiss lenses)  and connects to a Canon EOS mount.  They also make adapters for other brands of cameras.   It is   limited to 6 frames (for a full frame camera)  in a 3×2 mosaic and results in a roughly square stitched image  that would give you a 120 megapixel final image from your 20 megapixel camera.  (For my 5DSr the stitched image is over a gigabyte in size (about 1.2 gb) or roughly the equivalent of a 400 megapixel sensor.)

rhinocam front for blog

The “RhinoCam mount from the front showing a Hasselblad Zeiss 150mm lens being used. For this shot the sun was close to the lens axis so this bellows hood with “eyebrow” front attachment really protects the lens from flare.

On Monday a friend and colleague accompanied me to the Antique Gas and Diesel Engine museum in Vista to re-acquaint myself with the Rhino “Medium Format” adapter since I’d not used it in a while.  While wandering around she noticed a museum volunteer using a disc harrow on a field to break up the heavy clods left behind by the bottom blow that turned over the soil in preparation for this year’s wheat crop.  Here is a picture of her taking a shot

Lauralee at museum field

And here is one I took that I thought might make for an interesting poster layout.

Angelo Discing field 02

Museum volunteer Angelo is discing one of the museum’s wheat fields with a 1940s vintage Caterpillar D4 tractor.  The Field has already be turned over with a Bottom Plow and now the disc harrow, followed by a tines harrow  breaks up the large chunks to prepare the field for seeding of this year’s crop.

But I was here to test out this Rhino adapter.  Here is a shot of it set up and ready to go

rhino adapter from front

Here is the adapter.  The lens is a Hasselblad Zeiss V series.  The sliding back has the camera positioned over the lens here and you can see the viewfinder port slid out of the way to the right.  In operation you slide the viewfinder over the lens, compose the shot, then slide the camera in place where indicator marks and detentes allow you to line up the six shots (3 across and 2 vertically.)  Note the camera is mounted in the vertical position.

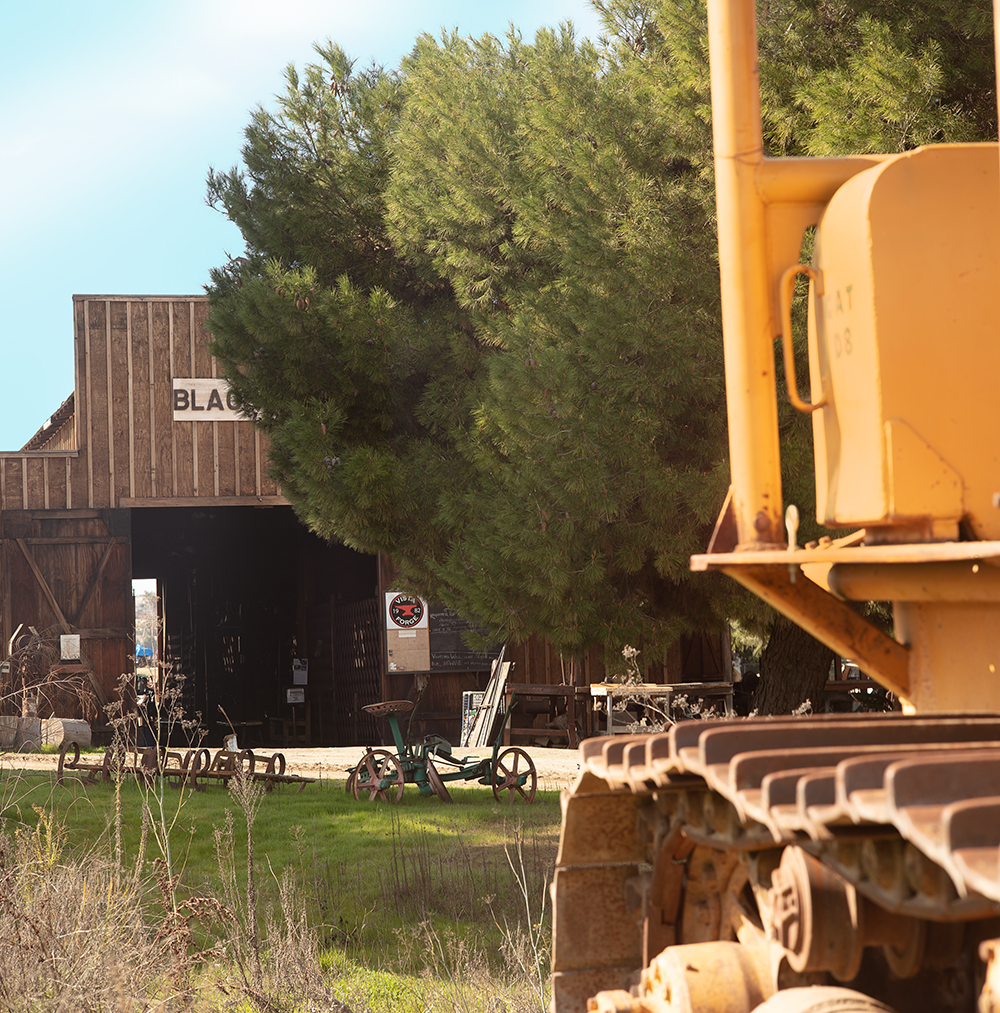
The camera and adapter in the shot above were set up to shoot the Museum’s Blacksmith shop.  The finished shot was chosen not for composition but to be able to capture near and far detail (the weeds in the middle ground and the shop in the background).  Here is the completed (stitched) shot.  The out-of focus tractor in the foreground seemed like it would be a good test of how this rig would render smooth tonalities such as on the tank.

Blacksmith at antique gas and diesel museum

Unfortunately the only way to really see the incredible resolution and smooth tones is to see a full sized print.  THe wind was blowing the trees a bit and this is a slow shutter shot so there is some blurring in the tree.  But it would be there with a single frame shot.  The native size of this image without enlargement but at printing resolution of 300 ppi, is approximately 45″ x 45″  Except for stitching and then lowering the resolution for the web, this is an unedited image.

Here is how the individual frames are assembled for the shot above.  Each of these frames starts out as a 50 meg capture by the 5DSr but then the slight overlap and a final image crop reduces the full resolution image to about 1.2 gigabytes.

Blacksmith at antique gas and diesel museum

To make the assembly easier for the software the frames are arranged “cartoon” style, left to right and top to bottom.  For this adapter you have to remember that the projected image circle is upside down and backward so you have to think about the order of the shots with the sliding back remembering up is down and left is right…

Now I wanted to take a more serious shot and all of the museum’s equipment presented some great details.  While there I spied what seemed to be an interesting detail shot to capture the complexity of a colorful old diesel engine.  This engine is still working.  The shot is, again, a stitch of 6 frames in a 3×2 mosaic.

Diesel Engine Detail 02

When you zoom in on this  stitched image, you can see the individual dust specks on the plug wires.  I can live with that level of detail…

The result is a smoothness of tone and sharp detail far more reminiscent of a large format transparency shot than the medium format shot it represents digitally.  To attain this level of resolution in a single frame is going to cost you a LOT of money, indeed many multiples of the cost of the Rhino adapter.  Now what this all means is that you can create images with incredible resolution without spending a lot of money and effort.  It will require a little practice to get speedy with them, but no more than it would take to learn to use Medium Format and Large Format gear in the first place.  So the only question remaining is… “are your images worth the effort?”

It made me wonder why I had put this adapter away.  It will now occupy a more standard place in my photo arsenal for anything needed resolution that does not move during the shot.

Posted in Uncategorized | Tagged , , , , , , , , , , , , , , | Leave a comment

Photo 360 for 2020

Some of you long term readers may remember previous years’ blog  segments on City College’s “Photo 360” events where each year we open our program and facilities to High School Students interested in Photography and perhaps a career in Photography.  It has grown from a one-day event for about 100 students all from San Diego Unified to this year a two day event for almost 300 from regional schools as well.

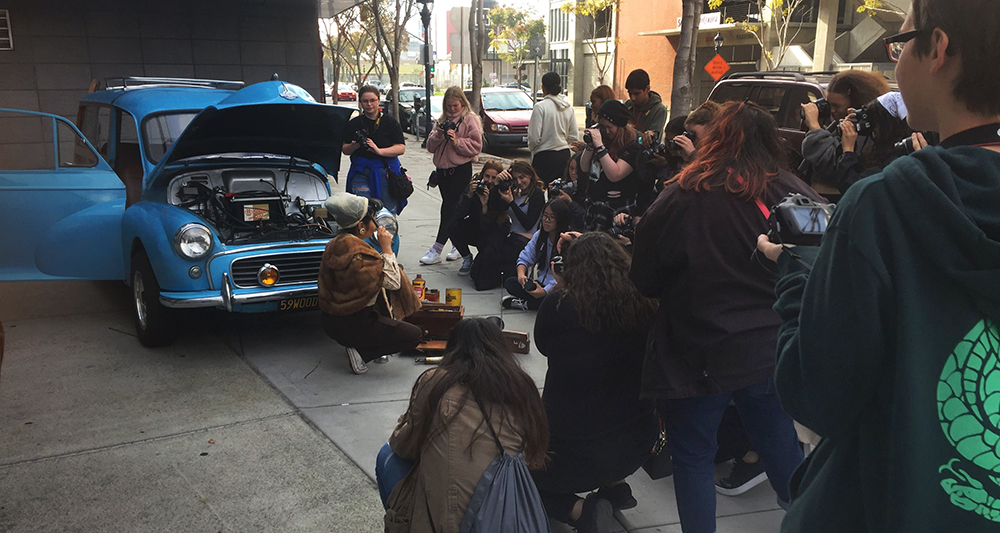
Since I’m “retired” (even though I’ll be back “pro rata” to teach this Spring’s Landscape Class – more on that later) I came onboard this year simply to help out and to present one of the workshop topics which, this year, was photographing vehicles.   It was, as always, a lot of fun for presenters and students alike.  For my section we had two different vehicles; a very cool restored 1959 Morris “Woody” and a very sleek 430 Ferrari.

For each group I gave a brief intro to some of the issues involved in shooting cars and then we let them blaze away.

Here are a shot of the Woody with our model.  In this scenario she was having a “breakdown” and trying to figure out what tool to use…

Woody with model 01

And here is the Ferrari. The day started out with a slight drizzle but soon cleared up.

ferrari front

And for those who think they’ve seen it all, when was the last time, even here in California, you saw a Ferrari with a Zombie at the wheel? The Special effects makeup instructor provided us with some “unusual” models for our shoots including some high fashion makeup.

Ferrari zombie

We received very high quality reviews from the participants and it was considered, once again, to be a success with everyone looking forward to next year.

I did chat with the car owners and discussed being able to take their cars out and doing some serious photography of them.  Both were amenable to it, and of course I’d show them here.  Now it is an issue of time so maybe by mid semester…  Meantime I’m REALLY anxious to go shooting for the upcoming class.


Posted in Uncategorized | Tagged , , , , | 3 Comments

Dealing with Nature – Part 6: Practicing at Home

Hey, Happy New Year and Happy New Decade.  The holidays slowed down my getting this segment ready but finally, here it is. OK, let’s pick up from the last post.

Once you realize you are not getting out of your predicament right away and will have to spend at least one night, maintaining your core body temperature becomes job number one.  That means, in the mountains especially, you will need to stay warm and that means you will need fire and shelter.  We’ll tackle the shelter issues in the next posts. Indeed, I was intending for this post in the series on emergencies for Landscape Photographers to launch into a fire-making segment since that may well be THE foundational skill for staying alive, right up there with staying hydrated; but hydration more a matter of preparation (having water WITH you) than woods skill to solve for this type of situation.

Remember I’m not talking about long term survival when the thin veneer of civilization is peeled away, but a relatively short term, i.e. 3-5 days staying alive if you are stuck out in the backwoods before rescue arrives.  Still, because of their importance for your longevity, I’ve hammered away on practicing to learn these skills before you need them to save your life or the lives of others.  But I received an excellent question from a reader on that subject when I talked about fire making in the last post.  He wrote, “What if you live in the city where they frown on you making fires in the parks or your yards?”  Good question. And I’d certainly not suggest you bring yourself to the unwanted and negative attention of the fire marshal or police while practicing your woods lore skills.  But, as you’ll see, you don’t have to.

Further reflecting on it, the truth is, there are several issues that also might make it hard to practice some of these skills.  For example, due to the fire danger from years and years of uncleared underbrush here in SoCal, the forests are tinderboxes just waiting for some ignition, so in dry season (most of the year) open fires are often not allowed even in camp and picnic grounds.  By the way, as an aside, by comparison, In Colorado you were encouraged to collect and use any dead wood to help reduce the fire danger.  But here, they require you to leave it all as “natural.”  It hasn’t worked out all that well for them, or for poor people whose homes are close to the forests, but the fire goddess, Madam Pele, has simply loved all the dead stuff lying around and the fires here are consequently infamous for their ferocity and speed of travel.

So before we venture out and have to do this for real, lets examine how a city dweller, or an apartment/condo dweller, or even a picnicker or camper here where open fires are not allowed, might practice starting a fire for emergency overnight ordeals out in the bush?   And if THEY can do it in town, anyone with greater access to locations where making a fire is allowed, has zero excuse for failing to practice what could easily turn into a life-saving skill.

So to practice in an urban setting, there are two things to remember.  The first stems from the martial arts dictum we mentioned up front, i.e. the best way to deal with an incoming punch is not to be there when it arrives.  If – IF – you have properly prepared for your photo trek, including letting people know your itinerary, carried with you the means to navigate in and out of your desired shoot location, have the tools you may need, been careful along the way and not overextended your hiking, climbing, endurance, skill levels, then the odds are very high you will not ever need to use the remainder of  those skills except to show off at the next camping trip.  The very act of properly preparing tends to make you think of the things you need to do in advance and to carry with you.  Survival is as much a mindset as it is a skill set.

However, in terms of fire-making skills specifically, the second thing to remember is that the beginnings of a fire – any fire — are quite small.  Even if you were intent on making a huge council fire (and why you would do that eludes me), you would still start with a small tinder bundle and small pile of kindling, no matter how much fuel you might pile on later.  Getting that small flame started can be practiced safely at your backyard/patio grill or, failing that, a large, heavy-duty roasting pan filled with sand or dirt as your substitute for the ground.  Learning to find and identify good wood sources can be done without actually gathering any of it if you are in an area that prohibits it.

Learning to further split down chunks of wood can be done with a firewood bundle from the grocery store.  And with that, you can learn to make tinder and kindling as well as you can using real found and gathered wood in the forest.  Knowing you have with you the proper ignition kit and how to use it to start a fire, even if you learned to do it in your back yard or on your patio, is as helpful as learning it over a campfire.  And trust me on this, you do want to learn it before you have to do it under emergency/survival conditions for real with your life, and maybe others, depending on your success.

(As an aside, we’ll be demonstrating a lot of this in the Landscape Class at City College this coming Spring Semester)

As photographers, especially if you are also professional portrait or product shooters, you probably already have the gear to even practice shelter making.  For example, light stands, properly staked or weighted can be substitute “trees”  or poles to help you learn to rig a lean-to shelter with your tarp and other gear I’ve recommended.   Indeed, if you are a seasoned location shooter for stills or video, your location kits and grip kits with stands, boom arms, clamps of every description, reflectors, flags, cordage, etc.   would place you well ahead of the game and all you would need to learn and practice is re-purposing some of that to rig a temporary shelter instead of location lights, light modifiers, etc., for which they are designed.  And once you understand how to do it with your photo gear, it will allow you to understand what to look for in nature to substitute for it with natural materials when necessary.

So for this segment, let’s return to the issue of starting a fire, but this time we’ll talk about doing it in the back yard so you can learn how to do that with minimal effort and almost no travel.  Just remember, except for location, it is exactly the same process out in the woods. You still need (1) a properly prepared place,  (2) a source of ignition,  (3) then something REALLY easy to ignite as your tinder.  Then you need (4) to have ready an intermediate material that the tinder can light (the kindling) and which, in turn, will burn long enough to light the (5) actual fuel.  Let’s examine each of these elements.

However, also pay close attention to what you will need to do and especially what tools you will need to accomplish these tasks.  If you do not have these tools or supplies with you, then you are going to be in deep trouble or at least be facing a truly miserable night.

First, before you start to construct and ignite your fire, take the time to prepare a place for it.  One of the huge fires this past decade in the San Diego area was started by an idiot pretend hunter who decided to make huge “signal fires” without proper preparation and it quickly spread and got out of hand.  Several people died and countless homes were destroyed by his ignorance.  Karma was asleep for that one and he got away safely.  The critical lesson is to make sure people know where to come look for you and then, if you must make a fire, make it for warmth and first, properly prepare the area.  If you are next to a stuck or disabled vehicle, use the roadbed itself instead of wandering away from your best shelter and starting a fire where you might bring down the whole forest.

But if you must survive away from the vehicle and in the forest, and you need a warming fire, then first prepare the ground for it.  Scrape the area free of debris and all loose flammable material.  The bigger this area the better to avoid sparks from launching out into the forest, but at least clear an area about 5 feet in diameter.  The drier the fuel the less it will spark.  Those cracks and flying sparks are moisture trapped in pockets in the wood, boiling and exploding while blowing out small pieces of burning wood.  Many outdoors experts recommend also digging down a little, perhaps six inches, to make sure there are no roots or covered materials that can catch fire and actually burn underground until finding a way to erupt into surface flames and then into a real wildfire.

Do NOT use your knife to dig this fire pit. (You DO have a real knife with you, don’t you???)  Its blade and sharp edge is too valuable to risk damaging it on hidden rocks.  Your knife should be seen as a toolmaking implement and not the final tool itself.  Find a stout branch, whittle a small flat spade-like end with it and use THAT to dig and scrape around on the ground, reforming it as it wears down.  If you have a folding (or real) shovel in your kit, then great, by all means use it.  The axe/shovel/pick tool I showed in a previous post is perfect for this but I normally do not lug it with me when away from the car.  So if I am forced to do this without the car right there, and I’ve not taken one of my survival backpacks which usually have a folding/entrenching shovel in them, then all I may have is my knife.   So, again, use your knife to make a digging tool, not AS the digging tool itself.

If you are able to create a depression for the fire, make some trenches to bring air into the center.  And if you can find them laying about, ring the pit with stones.  These will also provide some additional height to a barrier to sparks being ejected from the fire into the surrounding areas.  IF you were near a source of them, you could also line the fire pit with small stones according to some manuals.  But here is an issue.  If the stones were in the water, for example at a stream bed, even a dried one, they might contain pockets of water inside.  When those heat up and start to boil, they can make the stones explode in a shower of rocky shrapnel.  Unless you are absolutely certain about the stones being bone dry or gathered well away from water, just use ones found on the land for a ring and make sure the ground under the fire is free from anything that might ignite or smolder from the heat of the coals.

Of course, in town you need not worry about that, use the barbeque grill with some aluminum foil as the ground or if you do not have a grill, use the large roasting pan mentioned above with an inch or so of sand or dirt in it.  Now, lets get this thing going.

IGNITION:  Ignition is created by either a small flame itself (like with a match or lighter), or a source of sufficient heat to ignite flammable materials such as a hot spark (flint and steel or ferrocerium rod) or a hot beam such as from a lens element.

Depending on the ignition and  tinder to be used, the initial heat source itself might be all that is needed, or, it might require a secondary part such as the “char cloth” traditionally used with flint and steel, or some form of “fire-starter” material.  In that case, a “tinder bundle” is used to transfer the fledgling flame to the proper tinder itself if the ignition source itself does not itself include a flame.

If you were a tribal member away from civilization this would be something you did every day and so was easy for you.  But, let’s get real here: you are not; and for you it will not be easy, especially the first time. That is why now, in the 21st century, it is so much easier to simply have a match or lighter handy, perhaps even a candle, stored away in your vehicle.  When you are cold, a little unnerved by what is happening, and perhaps have some very anxious folks gathered around looking to you to help them make it through this ordeal, anything that will make it easier is worth its weight in gold.  And don’t fall for the myth that aboriginal people or pathfinders like mountain men, made their fires with only stuff found at the site.  Mountain men and explorers of the 1800s carried flint and steel and charcloth; many aboriginal people gather good fire drill spindles when they can and then carry them with them on treks.  It is not a failure of your Daniel Boone merit badge to do as they did, but with modern supplies such as matches or a lighter.  After all flint and steel was “modern” to Jim Bridger and the mountain men and the natives quickly adopted them when they could.

I believe in redundancy based on the old survival adage when referring to equipment and supplies: “one is none and two is one.”  If you only have one source of ignition and it fails or is lost, then you are now in deep trouble.  Always – ALWAYS – have at least one backup available, just in case.  I pre-make small fire starter bundles from dryer lint or cotton balls removed from pill containers.  For mine,  I also coat them in candle wax and pack them into cut-down cardboard tubes from paper towels or toilet tissue.  For mine I  include some magnesium shavings so that when ignited simply with a match or even a hot spark, they will burn very hot and catch most kindling on fire quickly and easily. They will burn for 10-15 minutes which is long enough to even dry and light some damp tinder.  REI and other camping supply houses have commercial fire starter available and it works fine.

By the way, should you make something like this, remember to NOT hold in in your bare hands to light it.  The magnesium burns at several thousand degrees.  Use some sticks like chop sticks if you don’t have pliers or something in your car.  My uncle used to make such fire starters from wax-impregnated cotton balls and a home-brew version of a sort of thermite.  It certainly worked but it was a little harder to ignite requiring a very hot spark, and, to me, it was a bit dangerous.  Thermite-type compounds are easily made but once ignited, burns at around 4,000 degrees.  It will then ignite darn near anything that burns, but it will also burn right through darn near anything — including steel – and are extremely difficult to extinguish until the material is all consumed.  As an example, thermite cannisters are used by the military to burn through tank armor. To be honest, it always scared me a little, so I tended to stick to traditional tinder.  However, my first job out of high school was as an engraver with Hallmark Cards in Kansas City.  Most of the embossing was done on magnesium plates, so I would collect the shavings and use them instead.  They were much easier to ignite and burned at about 2,000 degrees, which is still hot enough to catch even damp wood on fire.  It worked so well I still use it.

TINDER: Tinder is composed of flammable material that is so easy to ignite, that a small flame from either a lighter or match or from a fire starter such as a tinder bundle or even a small candle, can be successful.  The process is to start with easily ignitable material and add increasingly large pieces until a sustainable flame can be created.  To this end, such material as very small twigs, purpose made wood chips, saw dust, so called “feather” of “fuzz” sticks created on the spot, are used to create this “pre-fire” fire.  Often it was traditionally composed of dry grasses, tiny twigs, forest floor litter so long as it is dry.  However, one of my home-made fire starters will suffice to ignite the kindling directly and I don’t have to go on a quest for truly dry material for a traditional tinder bundle.

KINDLING: Kindling, the next step, is some relatively easy to ignite material that the small, tentative flame from the tinder can set it  ablaze, and which will, in turn, produce a flame of enough intensity and duration to ignite the lager fuel pieces. Kindling is usually finger-sized small, dry branches or pieces of a fuel log that were split down to finger size.  A hatchet or carefully employed axe can make easy work of splitting larger chunks of wood into smaller ones for kindling.  Note: do not – repeat, DO NOT — try to hold a piece upright with your hand and then swing a hatchet or axe down on the end to split it unless you are really tired of the hand you are using to hold the piece.  The injury you can inflict on yourself doing this will be astonishingly painful and because of the speed of infection out in nature, can bring your survival attempts to a swift and painful, if premature, end.  Besides, hitting yourself in the hand with the working edge of a sharp axe will pretty much destroy any plans you may have had about continuing your fire or shelter making project.

If you have a strong enough knife you can also use a technique called “Batoning” with it to split the wood down into useable kindling.  But unless you are working with very soft wood, if you try this with a thin blade or a folding knife, you will likely just break it and then have a small broken blade fragment that is not good for anything other than cutting yourself.  Making some “feather” or “fuzz” sticks mentioned above from a few pieces will make it easier to catch the kindling on fire. The small thin edges of the “feathers” will catch pretty easily and, in turn, ignite the main piece.  But this too is far easier with a really sharp knife not damaged by trying to dig with it.

Once the kindling starts to burn, additional pieces of kindling are added until a flame is well established, a bed of coals is started, and larger pieces can be added and will burn without crushing the starting pile.

Some campers and survivalists buy sticks of “fat wood” (readily available on eBay) to include in their survival kits especially when carried in a vehicle.  Fat wood is usually some type of pine, spruce, cedar, fir, etc. that has lots of resin and pitch in it.  It lights easily and burns very hot.  Lots of people buy bundles of it online to use with their fireplaces.  Good fat wood can even be lit with sparks from a ferrocerium rod directly without needing tinder.

FUEL: Fuel “logs” for a small survival or camp fire are typically wrist or arm-sized chunks of wood.  Wood of larger diameter can be used once the bed of coals and fire is well established.  But gathering such larger pieces requires some equipment (axe or saw) while the smaller parts can be often gathered by using leverage to break longer dry branches or standing dead saplings between trees, hitting them over rocks, other logs, or across trees.  You can pre-notch the longer branches or saplings so they will break where you want them to.  If the wood is truly dried out then you can often create fire sized pieces faster this way than trying to chop them to length with an axe. But do go back and look at the contents of my emergency backpack where you will see a folding saw…

FIRE LAY:  The “Fire Lay” describes how the components of the fire are to be arranged and structured.  Since we are into safety and wanting to make sure your survival fire does not get out of control and start a wildfire that consumes the forest and you along with it, the issue of the “Fire Lay” will also include preparing the ground upon which the fire will be constructed as we noted above.

So, with the ground prepared, it is time to start the fire making process.  Here, it is easy to get off into the weeds, so to speak.  “Experts” (and the quotation marks are on purpose here) declare there is only one proper way to lay a fire.  Unfortunately, they disagree as to what that is… and there are several traditional options and an almost unlimited number of ad hoc variations and hybrid combinations of approach.    Here is the real secret:  they all work.  So why the debates?

Well, given the size and dryness of the wood involved, some will work a little better in some conditions.  Traditional types are (1) the “teepee” lay, (2) the “log cabin” lay, and the “lean-to” lay.  Sometimes a combination is used, for example, kindling is structured as a teepee lay to give more surface area to the flame which burn upwards easier then downward, then fuel might be added in more of a log cabin lay.  If you are rebuilding a fire and part of a fuel log remains, or if you are starting a fire with minimal kindling then a lean-to approach can work to more quickly start igniting the larger pieces of wood.  This is used a lot in fireplaces and stoves where the fire was allowed to go out before all the pieces were completely burned to ash.

But, again, THEY ALL WORK.  The secret is that there is no secret.  Until you are experienced enough to know when one approach gives you a slight edge over another, the key for all of them is that the infant fire needs plenty of oxygen, especially at its early stages before it has gotten hot enough to set up its own draft.  The trick is to have the early tinder and kindling pieces close enough together to ignite each other but separated enough to allow a good flow of oxygen in and around them.

Blowing on the embers or using a bellows in a fireplace works because it increases the oxygen supply to the infant flame.  Some survivalists and outdoors experts use a bit of tubing or even straws to direct the flow of air to the critical spot rather than simply blowing that wastes a lot of your breath on non-burning areas.  When all else fails, use your hat to fan the starting flames into a real fire. Just down blow or fan embers into the surrounding areas to start a wild fire.  Those embers are capable of starting a fire in dry grass for several minutes until they completely burn out.

Just remember if you are doing this practice in a roasting pan or on a grill, all you really need is to get a small handful of kindling going.  If the kindling is lit then the added  dry fuel will catch easily.  Your task is to learn to get the fire going to the kindling stage, the rest is the easy part.

OK, so you have your fire going, now you can not only help warm yourself and your area, you can calm the nerves of any companions worried about the critters around (whether or not there actually are any to worry about), and you can help purify water or prepare some warm food or beverages If you thought to bring some.

But your upcoming night will be made far less miserable if you also have a good shelter.  So that will be our next segment.  We’ll then talk about dealing with injuries and then later we’ll wrap this series up with a final segment on getting yourself found as quickly as possible.

Stay tuned.  If this has been of interest or helpful to you, let me know or “like” the post.

Posted in Uncategorized | Tagged , , , , , | Leave a comment

Quick Aside for Fun

I’ve been working on the next segment of the “Dealing With Nature” series, but this week I actually got to go play a couple of times.  On Thursday I went to Balboa Park to help a friend learn to use a tilt/shift lens and to learn to make a multi-shot panorama.  I carried a camera around but didn’t have a chance to use it until late in the afternoon.  While setting up a pano I could not help but notice the incredible reflections in the pool in front of the botanical house.  And there, swimming in the midst of the astounding color was this lady Mallard so of course the title of the fun shot is “Lady of the Lake.”

LAdy of the Lake

I couldn’t help but wonder if the duck had any awareness of the color in which she was swimming.  This was taken with an old 135mm soft-focus lens designed primarily for portrait use.  The setting was to maximum but there was no time to re-calibrate it for the shot.

Then on Sunday, after breakfast, I almost always swing by the Ocean Beach Pier to see if there is anything interesting.  A major onshore wind has been whipping up some serious waves.  The pier was closed for safety.  I missed high tide but even here you can see the fury of the water and the height of the water.

OB pier 12-2019

Needless to say the surfers were staying out of the water.  Shooting the pier, never a good idea, would have been borderline suicidal…

Even if only for a couple of fun shots, it was nice to get out a little.  OK, back to the keyboard and series…

Posted in Uncategorized | Tagged , , , , , , | Leave a comment

Dealing with Nature –  Part 5:  But What if You Couldn’t Get Out?

I wondered if I would pique your interest with any of this.  Most photographers I have met here in SoCal give this almost no thought.  To the contrary, those I knew back in the Rockies thought about it all the time and were generally prepared mentally and equipmentally to deal with almost anything.  Perhaps that is because in that country, from Montana down to New Mexico, there exist far more places where the hope of rescue is slim if no one knows to come looking, and the places where adventures can be seriously life-threatening are far more common.

But that does not mean that such dangers do not exist here as well; they are just more isolated.  The serious landscape photographers, in search of new and exciting images, are precisely the ones to often find themselves in such places, and, unfortunately, in such trouble because they had no expectation of it beyond a pleasant hike in the beautiful country and the acquisition of some stunning images.

Here, too many weekend pathfinders think of the mountains and deserts as if they were just on a Disneyland adventure ride where it is exciting and thrilling in a vicarious sort of way, but where the apparent dangers are not real.  Yet, just this past week on the news, was a couple who were rescued barely in time (and by blind luck) and another instance involving a lone hiker who whose body was found too late.  Not one of them thought it would ever happen to them.  But it did.  Let me assure you, the dangers can be real even here in la-la land.

Big Pine Creek for blog

Taken along Big Pine Creek on the trail back to the site of the Palisades Glacier.  It was on the road to this trail my student below got stuck.  Further down this trail is a gorgeous glacial cirque but where the footing can be treacherous and requires constant attention.  On one workshop a student looking for a shot stepped off the trail and slipped down toward the creek, fortunately with only cuts and scrapes.  But it could have been far worse; had he made it all the way to the Glacier and THEN had he had a broken bone or seriously twisted ankle, and had he not had the help of other students to get out, the situation could have turned dire pretty quickly.  Even sending a person out for help would mean likely at least spending a night.

On a workshop into the eastern Sierras I had a participant with a flashy new 4WD leave the group on his own, with one other person, to go try out some of the roads into the mountains where he promptly discovered, to his surprise and in contradiction to the salesman’s assurances, that his spiffy 4-wheeler was not a tank.  Fortunately, they were not a long walk from the main road so help was relatively close and it was still early in the day.  But the road they were on could have taken them far into the backcountry where getting stuck could have turned very, very serious.  They had not bothered to tell anyone else what they intended or where they were headed or when they expected to be back.  Trust me, the next day we had a true “come to Jesus” meeting where the rules I thought I had spelled out earlier, were reinforced a bit more clearly and graphically.

Never forget this: when your vehicle will take you further into the wilds than you can walk out in a day (assuming you know where to go) you have just put yourself and any companions in potential trouble.  If it goes bad, it is on you.

So, after reading the little adventure of the previous post, some readers asked me what I would have done if Nikko and I had not been able to extricate the vehicle, or if the incoming storm arrived early or the vehicle was damaged and, for whatever reasons, the result was that we were really stuck there?  So let’s think about that.

Once it was obvious that we were not going to move the vehicle by ourselves, then the situation changes abruptly.  The next steps depend on the answer to the question as to whether we can expect anyone to come looking for us (or stumble upon us) in the relatively near future.  When you are off truly exploring new (to you) roads or trails, it is unlikely you would have left precise itinerary since you are making this up as you go along.  When truly exploring to areas, my Rocky Mountain photo friends are always prepared to have to bivouac in place.  Are you?

Nevertheless, a general idea of your working area and a time of expected return along with a description of the vehicle would be enough to get a rescue mounted the next day.  If that were the case, then we could reasonably expect rescue within a couple of days, especially, if we helped the rescuers to find us.   However, if that rescue effort is at least a day away,  don’t waste time or energy right now with trying to signal anyone.  You’ll need every scarp of energy you have to make it through this first night.

If no one knew where we were going or when we expected to return, then we might not be missed until it was too late for us and exposure or dehydration killed us.  It might be weeks before anyone else tried that road and if the weather turned bad, our survival would be in serious question if we had no way to extend our survival or get to help.

For sake of this entry, let’s assume for now that you have all gotten the message about leaving word of your plans and then sticking to them, and rescue can be expected in 2-3 days.  I have noted before and it is worth repeating, your car will be much easier to spot than you will, so staying with the car is almost always the best thing to do.  It provides a waterproof shelter and windbreak.  And if your engine still runs, it can, with proper rationing, provide enough heat to keep you from freezing (assuming you have proper clothing or blankets) for several days.  Unless you are intimately familiar with the local terrain and environment, trying to strike out across country can be suicidal.

California mountains near big bear for blog

Taken in the Big Bear area with a 500mm lens.  In the center distance is a ledge road winding into the mountains.  If a vehicle broke down there, the inhabitants would have to hike from there to the main road where this shot is from (a lot closer than where the ledge road forked off from its primary forest service road.  That would likely take more than a day and anyone doing that would have to be prepared for it. 

In our case we were on a road that branched from another road that led to a town.  If we absolutely had to leave the car, the trail would have been easy to follow though it would have probably taken a couple of days if the snow was getting deeper.  But trekking through the snow at night is less than brilliant, so we’d have needed to at least spend that first night at the car.  The first thing is to lay out and take stock of your resources; i.e. what do you have available from your survival/emergency gear, recovery gear, and even your photo gear, that you can bring into play to serve your survival needs?

Remember the triage of needs:  (1) maintaining body temp, (2) staying hydrated, (3) if you expect the arduous hike out such as what would be necessitated by the terrain in the above shot, then maintaining your energy reserves becomes important, and (4) making yourselves easy to find for any rescuers if you expect them to be looking.

As an aside, although I said where we were there was no cell phone coverage, it might have been worth the effort to hike to some higher ground and see if you could at least get a text message out since you need far less signal strength for a text than for a voice transmission.  If that worked, then after getting word out and an acknowledgement of your message, you’d be better backtracking to the car and wait for help. The better you were able to pinpoint your location in the message, or at the site of your shelter, the sooner that help will arrive.  Now you only need to stay alive and help them find you.

OK, back to the situation at hand.  Assuming your vehicle is not totaled, burned up, or at the bottom of a steep cliff, it will be the best spot for at least this first night.  So to get you through the night, miserable but alive, you will need to maintain core body temperature and stay hydrated.  Question 1: will the car start even if it cannot be moved?  If so, and if you have plenty of gas, you can ration that fuel with short, 10 minute periods of running the heater in the car.  Make sure the exhaust pipe is clear so that CO (Carbon Monoxide) does not enter or build up in the cab, which could be fatal for you.

Do you have plenty of water on board?  If so then you are all set to spend a very uncomfortable — but very survivable — first night.   But if any of those conditions (a car you can shelter in, enough fuel for running the heater, and several days of water) is not true, then you will need to take some affirmative action to solve it.  So question # 2 is, what time is it, or, more importantly, how long will it be until sundown, which will tell you how long you have to prepare for the night.  If the sun is still high you have plenty of time, but if it is low in the sky time is limited so it is more serious.  Stumbling around in the dark when you are already upset by the situation, is dangerous.  So how much time do you have?  Your hand can tell you.

Hold your hand at arms length away from you toward the sun, turn your palm inward, fingers together, and note how many finger-widths the sun is from the point where it will fall behind the terrain or trees.  Each finger width will give you approximately 15 minutes of sunlight to use. Put on a good hat or cap and gloves since you lose a huge proportion of body heat out through your head and exposed extremities.  As the sun goes down conserving body heat (and replacing it) becomes a life and death issue.

If the car cannot help provide warmth then you will need to start a fire.  That fire will also help if you need water for hydration but we’ll get to that in a moment.  Remember for a fire you will need tinder (the fine easy to start material that will then ignite…) some kindling (small finger sized DRY twigs or other flammables) which will then ignite the real fuel (arm thickness dry wood.)  Remember a few paragraphs above I asked what time it was, well that is now critical because you will need to gather the materials for your fire while you can still clearly see.  It is easier to STAY warm than to let yourself get chilled and try to re-warm your body, so time is now an important element in your actions.

So while there is still enough light for you to see, gather enough DRY material to get the fire going and to last through the night, roughly a pile of fuel logs about three feet wide by three feet tall and kindling equal to a couple of the logs.  Now, does your kit contain fire starting tinder material?  If not, you will need to create a tinder bundle from dry grasses, leaves, fine wood shavings, and resin filled “fat wood” you can find, or any paper you may have in the vehicle.  Are you beginning to see that movies and TV may have lied to you about how easy it is to do this unless you are well equipped and well-practiced at it?

But there is more to consider.  Do you have an ignition source to start the tinder going?  A match or lighter?  Even the cigarette lighter can work.  Sparks from your battery can do the job.  Or, if you have it, a ferrocerium rod and anything with a good sharp edge such as your knife or even broken glass or screwdriver blade it will make the process easier — not as good as a lighter or match but still fairly easy..  Let’s dispel another myth right now.  Unless you have a propane torch handy, starting a fire requires some tools and materials.  Even primitive tribes carried with them – and often held sacred – the materials to start a fire.  Perfect sticks for the “spindle” part of a bow or hand drill were prized and when found, gathered and kept safe.  Mountain men carried their flint and steel and char cloth with them.  NONE of them simply sat down to a pile of wood and magically started a fire with nothing to ignite it that was most likely not brought with them.  Just remember, none of those implements were designed to set a log on fire; they were designed only to set the tinder or tinder-bundle on fire.

While we’re in the myth-busting mode, let’s deal with a myth for photographers having to do with igniting a fire with a magnifying glass made from a photographic lens.  First of all, to use a magnifying glass of any type to ignite a fire needs good strong clear-sky sunlight, the higher in the sky the better.  Does it work?  You bet, and it is quite fast if you have good sun and good combustible material and all the variables are in your favor.  Once the sun starts to drop in the sky, however, it becomes much harder.  By the time the sun is near the horizon, using the lens from a planetary telescope will not get your fire going.  And, while we’re at it, tiny lenses like the one on a Swiss Army Knife, are not going to do it either. That little lens is great for finding that irritating splinter, but not so great as a reliable fire starter.  You will need a lens at least 2” to 3” in diameter to do this easily and even then, it’s easier during mid-day.  (BTW, a large (8×10) Fresnel lens will do it too.) But… when it is overcast or dark, you better have a plan B ready to go.

Now, as to the trope of using a photo lens or lens element:  it’s true that the front objective of a photo lens (The front-most lens element in the lens body) is normally a simplex or duplex lens that could be used.  But… it must be removed from the lens body.  Can you do that and without damaging the lens beyond repair?  Take a good look at the screws holding it together… your automotive or construction screw drivers are not going to work.  Counting on just grabbing your camera lens, with its complex arrangements of elements and groups, and focusing a hot spot to start something on fire, is almost certainly going to leave you with the prospect of a very cold night.

Don’t fight it. Don’t ruin a good lens.  Just toss a good lighter in your kit and be done with it.  As we said before, this is an emergency.  It is not a test of your 1840s-vintage mountain man skills, it is the 21st century, so take advantage of that chronology with your emergency/survival prep.  It is not what the preppers call a SHTF (fecal matter impacting the rotary air moving device) situation where you are on your own for months or even forever.  It is, instead, a relatively short term scenario, so your list of supplies and equipment is not extensive.  But this is not the time for cheap tools and equipment that may break the first time it is under stress. You are going to have enough to deal with without adding the frustration of failure after failure to get a fire going.  Since, even if it was the 1840s, you would have brought fire making supplies in your “possibles” bag, welcome yourself to modern times and carry a lighter or some “strike anywhere” matches along with the kindling and fuel gathering gear.

(If you’d like a little tutorial on how to do that, let me know.)

Once you have an ember glowing and smoking, gently envelope it in the tinder being careful not to smother it, blow softly on it until you get a flame, then place it under the first layer of kindling and then add kindling as needed to get a sustainable flame then add fuel, being careful to allow a flow of oxygen and not to allow the kindling or fuel logs to collapse and crush the beginning fire.

Once the fire is started and burning on its own, you can rig a space/emergency blanket from your survival/emergency kit to help reflect heat into the car like an oven. And now it is time to think about hydration.  And let’s dispel another myth right now.  Do not think that eating snow is the obvious and simple solution.  In fact, eating snow can speed up your demise.  Here’s why.  First, typical snow is about 10% water and 90% air.  That means you would have to eat a lot of snow to properly hydrate yourself even if you are not burning energy with other activities.

But it gets worse; eating snow is also an energy loser.  Your body has to burn energy in order to warm itself after the injection of cold snow.  It may already be struggling with the temperature issue and putting cold stuff inside will accelerate your energy drain.  Plus, it will accelerate your mental and motor functions losses as your body takes the warming blood from all extremities – including your brain – to keep the heart and lungs functioning.

Snow can be a source of water, even if an inefficient one, but you need to melt it first and drink it already warmed if possible and, better yet, with some bouillon cubes for at least a little protein.  That is why my pack (shown in part 4) contained the steel canteen cup, and why making a fire is essential even for hydration when snow is readily available, as counter intuitive as that may be.  And be further warned, old snow will be filled with debris and pathogens as harmful to you as drinking from a contaminated stream. Of course, if it is summer, you don’t even have that option available.  So, again, don’t fight it or try to be a hero, bring water with you.

When the short term survival issues (core body temperature and hydration) are dealt with, now you could think about food; not because you are likely to starve but because food is a major morale booster.  Being hungry is not pleasant under the best of situations; in an emergency if it chips away at your morale and dedication to survival, it can indirectly be deadly.  Protein for energy, carbs to help keep you warm, all contribute to getting you through this.  Forget hunting and trapping and fishing for a one or two day situation and just put protein or granola bars in your car sufficient for 2-3 days (6-9 bars per person) and if you have a way to heat water, some bouillon cubes..

So you made it through the night, certainly miserable, a little cold to be sure, but you woke up and discovered somewhat surprisingly, that you were alive and had made it.  Now with a whole day, there are some critical decisions to make.  So we’ll tackle those in the next post.


Posted in Uncategorized | Tagged , , , , | Leave a comment